
In our previous wanderings along Beorn’s Path, we built a second core set deck, this time using the Tactics and Spirit spheres. Escape from Dol Guldur is the most difficult scenario in the core set, and it is particularly ill-suited for solo play, as the loss of 1 hero for the first stage is very hard to overcome with only two usable heroes. So, in order to give ourselves a chance of escape, we will be playing “two-handed” – which means that we will use both decks as though we had two players playing. Tales From the Cards has an excellent Guide to Playing Two-Handed, which is a great introduction to playing the game this way, especially for those who have only ever played with one deck.
 The basic strategy for this scenario will be to move through the quest stages as quickly as possible. We cannot finish the quest while the Nagul of Dol Guldur is in play, so we will have to stop along the way to defeat it. Compared to the Hill Troll, the stats on the Nazgul are actually not too bad, but every time a shadow effect resolves from one of his attacks, we will have to discard a character. With the first two quest stages only allowing us to play one ally per round, total, this is something that we need to avoid at all costs. Ideally, we can get a Citadel Plate and some early damage on Gimli, and the dwarf can slay the Nazgul in a round or two. Other than that, the more quickly we can move through the quest stages, the less encounter cards we will have to face. Particularly in the first stage, where we will be without the help of one of our heroes, we will not want to hang around while our threat rises and the staging area fills with Orcs.
 Because the staging area starts with three guarded objectives, and our imprisoned hero is chosen at random, this scenario has a fair amount of luck involved. If Eowyn is the one in the dungeons, and Caught in a Web is one of the first cards revealed from the encounter deck, we will have very little hope of surviving. Once we can put progress on the second quest stage, our prisoner is freed, and our chances of survival improve dramatically. Still pace will be very important, several enemies, including the Nazgul, have a threat threshold of 40 so if we allow either deck’s threat to raise too quickly, we risk being overrun. Because we won’t know which hero is held prisoner until after setup, we will hold off on any more in-depth strategy until we know what our constraints are. With that introduction out of the way, let’s begin our attempt to Escape from the infamous dungeons of Dol Guldur.


Setup and Opening Hands
Unfortunately we will have to chose first player and decide on our opening hands, before we randomly determine which hero is held captive, so it will not be possible to look for specific strategies with our opening hands. In general, we want each deck to play to its strengths, but questing in particular is of utmost importance as we have to get progress on the second stage before we can free the prisoner. Starting with the first player, each player commits any of their characters to the quest, which means that Theodred would not be able to add resources to Thalin, Gimli or Eowyn on the first round if the Leadership/Lore deck is the first player. For this reason, we will choose to have the Tactics/Spirit deck start the game as the first player. The Tactics/Spirit deck draws the following opening hand:


![]()


We don’t yet know whether or not Gimli will be held prisoner, but Citadel Plate is also useful on defenders like Aragorn and Denethor. Northern Tracker, likewise, is great for location control, as long as we have access to Eowyn’s Spirit resources. The attachments in this hand are good as well, all the more so because our ability to play allies will be limited in the first two stages. Lastly, Gandalf is always a welcome sight, particularly in this scenario. The fact that he is neutral, and can be paid for with any kind of resources, is of even greater importance here. So we will keep this hand and draw the opening hand for our other deck.
The Leadership/Lore deck draws the following six cards: Daughter of Nimrodel, Faramir, Guard of the Citadel, Gleowine and two copies of Son of Arnor. Even though it includes some good cards, this is not a good hand. The first two stages limit us to playing one ally, between the two decks, per round. Consisting of all allies, much of this hand is going to be dead for the critical early rounds. Ideally, we want a hand that includes some attachments and events, or at least less expensive allies. With hope for a better hand, we mulligan and draw our starting hand of:


This is still a lot of allies, but we have definitely improved our hand. As long as we have access to Lore resources from Denethor, Miner of the Iron Hills is invaluable for removing Caught in a Web. Likewise, Daughter of Nimrodel will help with healing and Snowbourn Scout with a bit of location control. It is good to see Forest Snare and For Gondor! as they both provide us with ways to deal with enemies that will not count against the one ally per round limit. With the starting hands drawn, we will continue on to scenario setup.
The objective cards are guarded, so we will draw one encounter card for each one. For Dungeon Torch we draw Dungeon Jailor, for Shadow Key we draw The Necromancer’s Reach, which thankfully has no effect as no characters are currently exhausted, and lastly Gandalf’s Map guarded is guarded by a Tower Gate. For the last part of the setup, we randomly choose a prisoner. After giving each hero a number, we roll a die and determine that Aragorn is held in the dark dungeons of Dol Guldur. This is going to make the first stage a challenge, particularly for the Leadership/Lore deck. The heir of Isildur is the best quester among our Leadership and Lore heroes, and his ability to ready after questing to participate in combat will be hard to replace. With the scenario setup complete, we are ready to start the first round of the game.
Round 1: Stage 1B (0 of 9 progress)
Tactics/Spirit: 29 threat (First Player)
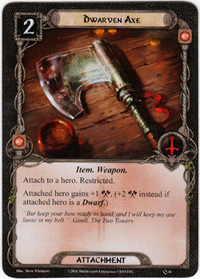
Hand: Dwarven Tomb, Citadel Plate, Northern Tracker, Dwarven Axe, Blade of Gondolin, Gandalf
— Thalin: 1 resource, 0 damage (4 of 4 hit points)
— Eowyn: 1 resource, 0 damage (3 of 3 hit points)
— Gimli: 1 resource, 0 damage (5 of 5 hit points)
Leadership/Lore: 28 threat
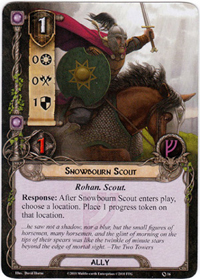
Hand: Miner of Iron Hills, For Gondor!, Gandalf, Forest Snare, Snowbourn Scout, Daughter of Nim.
— Theodred: 1 resource, 0 damage (4 of 4 hit points)
— Denethor: 1 resource, 0 damage (3 of 3 hit points)
— Aragorn: prisoner
Staging Area: Dungeon Torch (Dungeon Jailor guard), Shadow Key, Gandalf’s Map (Tower Gate guard)

 After collecting resources, we will draw a card for each deck. The Spirit/Tactics deck is acting as first player this round and draws a Veteran Axehand. Allies like the veteran, with no abilities or willpower, are less useful, but we can always discard it to fuel Eowyn’s ability. The Leadership/Lore deck draws a Valiant Sacrifice, which should come in handy since we have the perfect chump blocker, Snowbourn Scout, already in hand. As first player, will we have the Tactics/Spirit deck pass on playing anything in the planning phase. We want to save up resources for our more expensive cards.
For planning, the Leadership/Lore deck will pay 1 resource from Theodred for Snowbourn Scout. After the scout enters play we will trigger his ability which places 1 progress token on Tower Gate and explores it. Because The Necromancer’s Reach was resolved and discarded immediately as the guard of the Shadow Key, we now only have 1 objective in the staging area, the Dungeon Torch, that still has a guardian. We need to be very careful, however, with that Dungeon Jailor in the staging area. One round of questing unsuccessfully and one of the objectives will get shuffled back into the encounter deck. The last thing that we need in a scenario of this difficulty is to have to wander the dungeons of Dol Guldur, searching in the dark for a missing map.
With planning out of the way, we now must commit characters to the quest, beginning with the Tactics/Spirit deck. Because Gimli is tough enough to take an undefended attack, and we have a certain piece of armor ready for him to don next round, we will send Thalin, Eowyn and Gimli questing for the Tactics/Spirit deck. For Leadership/Lore, we are sorely missing Aragorn’s 2 willpower, but we do have the scout as a chump blocker, so we will go ahead and send both Denethor and Theodred. We want a resource to pay for Valiant Sacrifice in the likely event that the scout meets some orcs, so we will trigger Theodred’s ability to give himself a Leadership resource.

 For staging we reveal two cards: a Dol Guldur Beastmaster (which immediately takes 1 damage from Thalin’s ability) and our favorite treachery, The Necromancer’s Reach. At this point, each hero has 1 damage (except Aragorn, our prisoner). With a total of 9 willpower against 3 threat in the staging area, we make 6 progress on the first stage of the quest. Even if each player discarded a card to fuel Eowyn’s ability, we would still be 1 progress short, and that is not considering the objective that we have yet to claim. Since we should be able to easily clear this stage, with Eowyn’s help, next round, we will elect not to discard anything to her this round.
 Because we actually want to get wounds on Gimli to fuel his berserker counter-attacks, the Tactics/Spirt deck will choose to optionally engage the Dungeon Jailor. It is very important in this scenario to get the Jailor is out of the staging area as quickly as possible; now there is no danger of his ability impounding any our essential objectives. Since it would otherwise engage the the first player, the Leadership/Lore deck will then optionally engage the wounded Dol Guldur Beastmaster.
When it comes to combat, we do not have a ready defender for the Jailor, so we will hope for the best as shadow effects on undefended attacks tend to be worse. The Leadership/Lore deck has a perfect solution to the Dol Guldur Beastmaster and exhausts the Snowbourn Scout to defend it. The shadow card for the Jailor is a harmless Eyes of the Forest; with a very annoying when revealed effect, we are glad to see that go to the discard pile. The Beastmaster gets two shadows cards, Caught in a Web and a harmless Tower Gate. The when revealed effect on Caught in a Web can be game-altering, particularly in this scenario where we are resource constrained already, so we are very fortunate to see it as a shadow card.
An early bit of luck is much welcomed, as escaping from the dungeons of Dol Guldur is not going to be easy. So Gimli will take 2 damage from the undefended attack and the scout will meet an untimely end. Thanks to Theodred, we are prepared for this. With his job of reconnoitering the Tower Gate complete, we pay 1 resource from Theodred, and the Snowbourn Scout has valiantly sacrificed himself. This allows us to draw 2 cards: Sneak Attack and Gleowine. That was a very worthwhile trade. Adding more card draw when we tuned our Leadership/Lore deck is definitely looking like a good decision. With no ready characters to counter-attack we are done with the first round. The threat for each deck is raised by 1 and we move on to round 2.
Round 2: Stage 1B (6 of 9 progress)
Tactics/Spirit: 30 threat – Engaged: Dungeon Jailor
Hand: Dwarven Tomb, Citadel Plate, Northern Track., Dwarven Axe, Blade, Gandalf, Vet Axehand
— Thalin: 2 resources, 1 damage (3 of 4 hit points)
— Eowyn: 2 resources, 1 damage (2 of 3 hit points)
— Gimli: 2 resources, 3 damage (2 of 5 hit points)
Leadership/Lore: 29 threat (First Player) – Engaged: Dol Guldur Beastmaster
Hand: Miner of the Iron Hills, For Gondor!, Forest Snare, Daughter of Nimrodel, Gleowine, Gandalf
— Theodred: 1 resource, 1 damage (3 of 4 hit points)
— Denethor: 2 resources, 1 damage (2 of 3 hit points)
— Aragorn: prisoner
Staging Area: Dungeon Torch, Shadow Key, Gandalf’s Map
The Leadership/Lore deck is now acting as first player and draws a Guard of the Citadel. The Spirit/Tactics deck draws Stand and Fight, which can definitely be nice in this scenario, since putting an ally into play does not count against the 1 per round limit. For planning, the Leadership/Lore deck needs to save resources, so we will pass on having it play anything. The Spirit/Tactics deck will pay all of the available resources from its dwarf heroes to attach Citadel Plate to Gimli. With a total of 9 hit points, Gimli now gives us an answer to the question: who will kill the Nazgul?
 In the quest phase, the Leadership/Lore deck will commit Theodred and Denethor, triggering Theodred’s ability to add 1 resource to Denethor’s resource pool. For its part, the Spirit Tactics deck will commit Thalin and Eowyn, and hold Gimli back for combat. For staging, we reveal a Cavern Guardian and Dol Guldur Orcs, both of which take 1 damage from Thalin’s ability. The doomed 1 on the guardian will raise each deck’s threat by 1, and those pesky Dol Guldur Orcs will do 2 damage to someone committed to the quest, in this case, Theodred. Theodred is now clinging to life with 1 remaining hit point, so it is good that Denethor has been saving up to pay for Daughter of Nimrodel. With 4 threat in the staging area, our 7 willpower is enough to give us the 3 progress that we needed to complete the current stage. The Tactics/Spirit deck will raise its threat by 2 to attach the unguarded Gandalf’s Map to Eowyn, moving us on to stage 2, Through the Caverns. We are 1 step away from springing Aragorn from jail.
For the encounter phase, the Leadership/Lore deck will engage the Dol Guldur Orcs and the Tactics/Spirit deck engages the Cavern Guardian. At the beginning of the combat phase, we will pay 1 resources from Theodred to play sneak attack. Gandalf, the ever-versatile Grey Wizard, surprises the wounded Dol Guldur Beastmaster, killing it with one swing of his staff. We are then ready to deal shadow cards and declare defenders.
The Leadership/Lore deck will have Gandalf defend against the Dol Guldur Orcs. The Tactics/Spirit deck is going to take a risk and not defend either the Dungeon Jailor or the Cavern Guardian. Undefended attacks are risky, particularly if we get unlucky with shadow cards, but at this point we want to get more damage on Gimli so that he can start clearing out the engaged enemies.
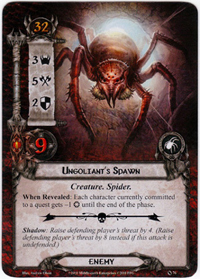 The shadow card for Dol Guldur Orcs is Mountains of Mirkwood, which has no effect and Gandalf laughs off their puny 2 attack. For the Dungeon Jailor’s attack we get less lucky and the shadow card revealed is Ungoliant’s Spawn. This is where undefended attacks can really hurt us. Because we did not block, the Tactics/Spirit deck now must raise its threat by 8. Being limited to playing 1 ally per round makes it difficult to get many extra defenders, which opens us up to these kinds of shadow effects. Fortunately the Jailor only does 2 damage, so Gimli should be able to survive the last attack.
Lastly, the shadow card for the Cavern Guardian is the harmless Endless Caverns so we will have Gimli take 2 more damage. Now that the enemy attacks are complete, Gimli stikes and, since he now has 7 damage, hits the Dungeon Jailor for 9, which easily kills it. At the end of the combat phase, sneak attack returns Gandalf to the Leadership/Lore hand. With nothing left to do in this round, each deck has its threat raised by 1 and we move on to freeing Aragorn from the oubliette.
Round 3: Stage 2B (0 of 15 progress)
Tactics/Spirit: 42 threat (First Player) – Engaged: Cavern Guardian
Hand: Dwarven Tomb, Northern Tracker, Dwarven Axe, Blade, Gandalf, Vet Axehand, Stand and Fight
— Thalin: 1 resources, 1 damage (3 of 4 hit points)
— Eowyn: 3 resources, 1 damage (2 of 3 hit points), Gandalf’s Map
— Gimli: 1 resources, 7 damage (2 of 9 hit points), Citadel Plate
Leadership/Lore: 31 threat – Engaged: Dol Guldur Orcs
Hand: Miner of I.H., For Gondor!, Forest Snare, Daughter of Nim., Gleowine, Guard of Cit., Gandalf
— Theodred: 1 resource, 3 damage (1 of 4 hit points)
— Denethor: 4 resources, 1 damage (2 of 3 hit points)
— Aragorn: prisoner
Staging Area: Dungeon Torch, Shadow Key
 After collecting resources, the Tactics/Spirit deck draws The Galadhrim’s Greeting and the Leadership/Lore deck draws a Sneak Attack. This is shaping up to be a great turn, we have an answer to the Tactics/Spirit deck’s rising threat, and we will be able to get another inexpensive use out of Gandalf. For planning the Tactics/Spirit deck will go ahead and pay all 3 resources from Eowyn to play Galadhrim’s Greeting. Since the Leadership/Lore deck’s threat is not too high at this point, we will go ahead and choose to lower the Tactics/Spirit deck’s threat to 36. This is one of the great strengths of the Tactics/Sprit deck, it has other means that Gandalf for lowering its threat. The Leadership/Lore deck will spend 3 resources from Denethor to play Daughter of Nimrodel. Finally, we have some healing to start managing all of the damage to our heroes.
 As long as we can quest successfully and put at least one progress on stage 2, we will free Aragorn and can use him for combat. Although we could be conservative and send fewer characters questing, our ever-rising threat is a growing concern, so we will continue with the aggressive strategy. With that in mind, the Tactics/Spirit deck will commit Thalin and Eowyn to the quest and the Leadership/Lore deck will commit Theodred to the quest. Theodred then triggers his ability and gives himself a resource.
 At the staging step we reveal the first card from the encounter deck, Under the Shadows, which simply adds 2 threat to the staging area for this phase. The second card revealed is Hummerhorns, an enemy with a terrible engagement effect, but with a threat threshold of 40 we can hold off on dealing with them for the time being. The Hummerhorns takes 1 damage from Thalin’s ability, but this is sadly not enough to kill it. Those are some mighty tough hornets.
In order to make more quest progress, each deck will discard 1 card from it’s hand to trigger Eowyn’s ability. The Tactics/Spirit deck will discard Dwarven Axe (Gimli is big enough already) and the Leadership/Lore deck will discard Guard of the Citadel (an ally that we can’t afford to play right now). The total of 3 threat from the staging area is exceeded by our 8 total willpower and we make 5 progress on the quest. Aragorn is free! We turn the heir of Isildur face up and deal 1 damage to him. But the triumphant cries of his comrades are drowned out by a horrible shriek. The escaped prisoner has not gone unnoticed, and the Nazgul of Dol Guldur is added to the staging area, ready to strike. Even choosing not to engage the Nagul is hazardous, as it contributes 5 threat to the staging area.
For engagement, both enemies in the staging area have a threat threshold of 40, and we are not yet ready to deal with them, so neither deck will optionally engage anything. At the beginning of the combat phase, we will exhaust the Daughter of Nimrodel to heal two damage on Gimli. This will free him up to take another undefended attack so that he is ready to counter-attack. The Tactics/Spirit deck will not declare a defender for the Cavern Guardian and the Leadership/Lore deck exhausts Denethor to defend the Dol Guldur Orcs. The shadow card for Cavern Guardian is a Great Forest Web, with no shadow effect Gimli takes 2 damage and has 2 hit points remaining. For the Dol Guldur Orcs, the shadow card is an Enchanted Stream, which also does not have a shadow effect and Denethor’s 3 defense means that he does not take any damage.
Gimli and Aragorn counter-attack, killing the Cavern Guardian and Dol Guldur Orcs respectively. Taking stock of things, the good news is that we’ve rescued Aragorn, but the bad news is that we have 6 threat worth of nasty enemies sitting in the staging area. Fortunately each of our decks has a few more tricks up their sleeves, so we increase our threat and move on to the next round with high hopes.
Round 4: Stage 2B (5 of 15 progress)
Tactics/Spirit: 37 threat
Hand: Dwarven Tomb, North. Tracker, Blade, Gandalf, Vet Axehand, Stand and Fight, G. Spearman
— Thalin: 2 resources, 1 damage (3 of 4 hit points)
— Eowyn: 1 resources, 1 damage (2 of 3 hit points), Gandalf’s Map
— Gimli: 2 resources, 7 damage (2 of 9 hit points), Citadel Plate
Leadership/Lore: 32 threat (First Player)
Hand: Miner of I.H., For Gondor!, Forest Snare, Gleowine, Gandalf, Sneak Attack, Henamarth R.
— Theodred: 3 resource, 3 damage (1 of 4 hit points)
— Denethor: 2 resources, 1 damage (2 of 3 hit points)
— Aragorn: 1 resource, 1 damage (4 of 5 hit points)
Staging Area: Dungeon Torch, Shadow Key, Nazgul of Dol Guldur, Hummerhorns
The Leadership/Lore deck is now the first player, and after drawing Henamarth Riversong, it will pass on the planning phase, in order to save up for next round. The Tactics/Spirit deck draws a Gondorian Spearman which it will play during the planning phase using two resources from Gimli. Additionally, one resource is spent from Thalin to attach Blade of Gondolin to Gimli. This will help add progress to the quest, but it is the dwarf’s second restricted attachment, so hopefully we won’t need another citadel plate.
During the quest phase, the Leadership/Lore deck will pay 1 resource from Theodred to sneak attack Gandalf into play. The grey wizard will deal 4 damage to the Nazgul of Dol Guldur and then commit to the quest along with Aragorn and Theodred. Theodred’s ability gives an extra resource to Aragorn, which he uses to ready. The Spirit/Tactics deck will commit Thalin and Eowyn to the quest and it is time for staging.
 The first card revealed from the encounter deck is our new favorite enemy, the Dol Guldur Orcs. Fortunately Gandalf is along for the quest so he will take the 2 damage from the orcs’ when revealed effect. Since he is leaving play at the end of the phase anyway, this is as close to a “blank” when revealed effect as we can hope for. The second card revealed from the encounter deck is Chieftan Ufthak, a far more formidable enemy. Each time the Chieftan attacks it gets stronger, so it looks like we have found a prime target for our Forest Snare (the Nazgul of Dol Guldur has errata which says it cannot have attachments).
To continue our aggressive questing strategy, we will discard For Gondor! and Veteran Axehand to give Eowyn +2 willpower. With a total of 14 willpower against 10 threat in the staging area, we make 4 progress on stage 2 and now have only 6 progress left to go. At the end of the end of the quest phase, our sneaky wizard one again returns to hand from play. It really is too bad that the core set only includes a single copy of Horn of Gondor.
 For engagement, the Leadership/Lore deck engages Chieftan Ufthak and the Tactics/Spirit deck will engage the Dol Guldur Orcs. Denethor will defend the Chieftan and Aragorn, finally putting his sentinel ability to use, will block the Dol Guldur Orcs. The shadow card revealed for Chieftan Ufthak is Under the Shadow, which has no effect so Denethor again takes no damage. The Chieftan’s forced effect then triggers, which means he will be attacking for 5 next round, so we need to find an answer for him soon.
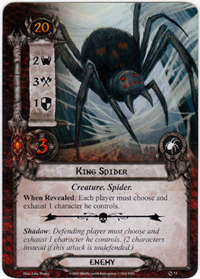
The shadow card for the Dol Guldur Orcs is a King Spider which requires the defending player to exhaust a character. This is one of those quirks of the rules, even though Aragorn is the defending character, the Spirit/Tactics deck is still the “defending player”, so we will exhaust the Gondorian Spearman to satisfy this effect. Fortunately, Aragorn does not take any damage from the attack. Gimli is the only character ready to counterattack, and he easily dispatches the Dol Guldur Orcs triggering blade of Gondolin to add one more progress to the current quest. Before ending the round, Daughter of Nimrodel will heal 2 damage on Theodred, brining him back from the brink of death. With that, each deck raises its threat by 1, and we continue to the next round with the goal of moving on to the final state of the quest.
Round 5: Stage 2B (10 of 15 progress)
Tactics/Spirit: 38 threat (First Player)
Hand: Dwarven Tomb, North. Tracker, Gandalf, Stand and Fight, Unexpected Courage
— Thalin: 1 resource, 1 damage (3 of 4 hit points)
— Eowyn: 2 resources, 1 damage (2 of 3 hit points), Gandalf’s Map
— Gimli: 2 resources, 7 damage (2 of 9 hit points), Citadel Plate, Blade of Gondolin
Leadership/Lore: 33 threat – Engaged: Chieftan Ufthak
Hand: Miner of I.H., Forest Snare, Gleowine, Gandalf, Henamarth R., Steward of Gondor
— Theodred: 3 resource, 1 damage (3 of 4 hit points)
— Denethor: 3 resources, 1 damage (2 of 3 hit points)
— Aragorn: 2 resources, 1 damage (4 of 5 hit points)
Staging Area: Dungeon Torch, Shadow Key, Nazgul of Dol Guldur, Hummerhorns
 After resources are added, the Tactics/Spirit deck draws an Unexpected Courage and the Leadership/Lore deck draws a Steward of Gondor. Gimli has been waiting for the Spirit attachment the whole game, with it he will be ale to contribute to the quest and still participate in combat. The resource generation from Steward of Gondor would have been nice a lot earlier, but it is better late than never. For planning, the Tactics/Spirit deck will pay 2 resources from Eowyn to attach Unexpected Courage to Gimli.
With that done, the Leadership/Lore deck has several things to play. First of all 2 leadership resources are spent from Aragorn to give Denethor his rightful title of Steward of Gondor. This attachment is immediately exhausted to give Denethor a total of 5 resources. Forest Snare is then played on Chieftan Ufthak using 3 of these resources. The other two resources from Denethor, along with the 3 resources from Theodred, are used to pay for Gandalf, who does an additional 4 damage to the Nazgul. Our most-feared foe is now 1 damage away from being slain.
The goal is the move to the final stage of the quest, so we will be very aggressive questing this round. The Tactics/Spirit deck will commit Thalin, Eowyn and Gimli, who immediately readies thanks to Unexpected Courage. The Leadership/Lore deck then commits Theodred, Aragorn, Gandalf. Lastly, Theodred triggers his ability to give 1 resource to Eowyn.

 For staging we reveal two locations: Mountains of Mirkwood and Endless Caverns. Endless Caverns not only has doomed 1, but it surges, revealing an Enchanted Stream. That is a lot of locations in the staging area, but unfortunately Northern Tracker is an expensive ally to play. With 11 threat in the staging area, we really want to get to 16 willpower to allow us to complete this stage, so we will discard Henamarth Riversong and Northern Tracker to give Eowyn the needed +2 willpower. It is hard sacrificing good cards like this, but these decks are not strong enough to play through this scenario slowly – our greatest chance of survival is to move quickly and carefully.
With all of the locations in the staging area, Northern Tracker seems like the card to keep, but we don’t have a lot of Spirit resources, and at this point it is much more cost-effective to use Dwarven Tomb and Stand and Fight to bring the Snowbourn Scout into play multiple times. This also has the advantage of giving us an ally that we can afford to chump block if the need arises. We now have the 15 progress needed to advance to the final stage, but we still need to claim the last 2 unguarded objectives. Since we don’t want to raise our threat right before the encounter phase, we will wait to do that until later in the round.
Thankfully, both decks’ threat is still barely below 40, so we can afford to ignore the Hummerhorns for 1 more round and instead the Tactics/Spirit deck will optionally engage the Nazgul of Dol Guldur. If the Nazgul can attack and gets a shadow effect, we are in big trouble. Fortunately we have a certain Spearman to ensure that we finish him off before anything goes awry. We deal a shadow card to the Nazgul of Dol Guldur and prepare to end his existence on Arda. Poor Chieftan Ufthak is caught in a trap, so he will also be dealt a shadow card, but since he cannot attack, it will be discarded without being resolved.
After declaring the Gondorian Spearman as the defender of the Nazgul of Dol Guldur, we trigger his response effect, which kills the enemy before it ever has a chance to attack. This is one of those singularly awesome moments where the Lord of the Rings LCG paints a fantastic mental picture for us.
A lowly spearman of the citadel, armed only with his trusty spear. Standing there, minding his own business on a sunny Saturday afternoon. Out of nowhere, one of the 9 ring-wraiths, undead lords of a forgotten age, comes charging out of the sky. Riding a nameless fell beast, bred in times immemorial in the deepest pits of Barad-dûr, the wraith stikes fear into all who behold it. All, that is, except our trusty spearman, who is too busy staring into the distance and daydreaming to notice his peril. After unceasing harassment by that meddling grey wizard, the Nazgul is determined to take out at least one of Sauron’s enemies before its corporeal form is destroyed by the accursed Istari. But lo, it has chosen poorly! Just as it reaches out with its skeletal hand to snap the neck of this impudent man-creature, it realizes its folly too late. The Nazgul of Dol Guldur, terror of the Anduin valley and enemy of all the free-peoples of Middle-Earth, has just impaled itself on what amounts to a sharpened stick. Once our befuddled friend is done wetting himself, he shakily half-walks, half-stumbles to the nearest stream to clean the gore off of his weapon. All in a days work for the Gondorian Spearman.
Since neither enemy actually attacked, both of their shadow cards are discarded without being resolved. Now that we have passed the encounter phase, it is safe to raise our threat and grab the last two unguarded objectives. The Leadership/Lore deck will raise its threat by 4 to take both objectives: Shadow Key will be attached to Aragorn and Dungeon Torch is attached to Theodred.
With the objectives secure, we finally move on to the final quest stage. We know that Aragorn will be taking damage from the key, so before ending the round we exhaust Daughter of Nimrodel to heal him. At the end of the round, in addition to readying everything and raising our threat, Aragorn takes 1 damage from the Shadow Key, and the Leadership/Lore deck raises its threat by 2 from Dungeon Torch. With our heroes all wounded, and our threat dangerously high, we come Out of the Dungeons and begin our last, desperate flight for safety. If we can make one big push and overcome the 7 quest points on this stage, we will successfully make our Escape from Dol Guldur.
Round 6: Stage 3B (0 of 7 progress)
Tactics/Spirit: 40 threat
Hand: Dwarven Tomb, Gandalf, Stand and Fight, Gondorian Spearman
— Thalin: 2 resource, 1 damage (3 of 4 hit points)
— Eowyn: 2 resources, 1 damage (2 of 3 hit points), Gandalf’s Map
— Gimli: 3 resources, 7 damage (2 of 9 hit points), Citadel Plate, Blade of Gondolin
Leadership/Lore: 41 threat (First Player) – Engaged: Chieftan Ufthak (Forest Snare)
Hand: Miner of I.H., Gleowine, Self Preservation
— Theodred: 1 resource, 1 damage (3 of 4 hit points), Dungeon Torch
— Denethor: 3 resources, 1 damage (2 of 3 hit points), Steward of Gondor
— Aragorn: 1 resources, 1 damage (4 of 5 hit points), Shadow Key
Staging Area: Hummerhorns, Mountains of Mirkwood, Endless Caverns, Enchanted Stream
Now that we have slain the Nazgul, all that remains between us and freedom is one final sprint Out of the Dungeons. After two stages of being limited to playing a single ally per round, between the two decks, we can finally play as many allies as we want. One further wrinkle is added in this stage. At the beginning of the quest phase, each deck will place its top card face down, engaged with as an “Orc Guard”. With 1 attack, 1 defense and 1 hit point, these guards might not seem threatening. However, unless we can kill them each round, they can pile up and overwhelm us. As we saw earlier in the game, shadow cards from undefended attacks can be far more dangerous than the attack itself. So instead of sitting around waiting to be mobbed by guards, we will attempt to make a mad dash to daylight.
The Leadership/Lore deck is first player and draws a Self Preservation after resources are collected. The Tactics/Spirit deck draws another Gondorian Spearman, but sadly there are no more Nazgul around for him to kill. For two resources from Denethor, the Leadership/Lore deck plays Gleowine. It would have been great to get the minstrel out earlier, but with the limitation on playing allies, and the heavy fighting, we always had a more immediate need for other cards. The Tactics/Spirit deck will go ahead and pay 5 resources for Gandalf, who immediately kills the Hummerhorns. The wizard’s help could not have been more, if the Hummerhorns had engaged us this round, we would have lost a hero.
 With planning out of the way, we move on to the quest phase. At the beginning of the quest phase, each deck places its top card face down, engaged with it as an “Orc Guard”. If all goes well, these guards will not play a part in the game’s outcome. We know want to send as many characters on the quest as we can spare. The Leadership/Lore deck commits Aragorn, Theodred and Gleowine. Theodred gives an extra resource to Aragorn, and the ranger readies. The Tactics/Spirit will then commit Gandalf, Thalin, Eowyn and Gimli, readying the dwarf with Unexpected Courage. With our characters committed we await our doom from the encounter deck.
The first card revealed from the encounter deck is The Necromancer’s Reach. It deals 1 damage to Gandalf, Thalin, Eowyn, Theodred and Gleowine. Gimli and Aragorn, thankfully are out of Sauron’s reach as they have been readied. This puts many of our heroes close to death, but as long as the next card revealed is not another of the same treachery, we should survive. The last card revealed from the encounter deck is a Dol Guldur Orcs. It will do 2 damage to Gandalf, who now has 1 hit point remaining. With a total of 7 threat in the staging area, we count 15 willpower. Before resolving the quest we will exhaust the Daughter of Nimrodel to heal 2 damage on Theodred. Without needing to discard any cards for Eowyn’s ability, we have made 7 progress on the final quest stage and won the game!
Score and Recap
So at last, we freed the imprisoned Aragorn and escaped from Dol Guldur to tell the tale. Our heroes are all a bit worse for the wear, but at least they survived the ordeal. Between the two decks, we count a total threat of 81 after 5 full rounds (rounds tally during the refresh phase). With 1 damage on Aragorn and Denethor, 2 damage on Thalin and Eowyn, and 7 damage on Gimli we have a total of 13 damage to our heroes. Dungeon Jailor and Hummerhorns give us 10 victory points, so our final score is:
81 (threat) + 50 (rounds) + 13 (damage) – 10 (victory) = 134
Astute readers will notice that we took a very aggressive strategy throughout the game. This was essential to not only free our hero, but escape the dungeons before our threat was too high and we got stuck on locations, or overwhelmed by swarms of enemies. There were even a few rounds where we quested with Theodred and he was 1 damage away from being killed. This was a risky choice, but his resource generation was key, especially when we started the game with one of our heroes in prison. Everyone has a different preferred strategies for scenarios like this one, and it is possible to win with a more conservative strategy. In this case, with only two copies of cards like A Test of Will and Feint, we opted for a more brute-force approach. Cards like the Shadow Key, which raises our threat an additional two each round, almost require this kind of agressive pace.
Between the ever-present Gandalf and Gimli’s amazing attack power, we were mostly able to manage the enemies that stood between us and our escape. Once we got Daughter of Nimrodel in play, we were able to get the treachery damage under control, and things became a bit less risky. Even so, our success in this scenario still came down to the last card revealed from the encounter deck. Escape from Dol Guldur, is a punishing scenario, and the fact that we could not play more than 1 ally per round, for most of the game, meant that we had not choice but to take undefended attacks. There is obviously a lot more to dig into in terms of strategy for this scenario. But this post is long as it is, so we will conclude it with a good rule of thumb for Lord of the Rings LCG strategy:
The harder a scenario is, the more you have to gain from an aggressive strategy.
That’s all for today, it’s time to go roll around in the grass and take a trip to the woods. I hope that you all enjoyed our exciting escape from the foul dungeons of Dol Guldur. Check back soon as we make more changes to our decks in preparation for the upcoming journey through the Shadows of Mirkwood.


I always enjoy these play-through posts. In general, I tend to play fairly aggressively, but you’re right, I start becoming downright reckless with some of the harder quests. My successful experiences with Into Ithilien and Siege of Cair Andros have been sprints.
Yes, Into Ithilien is probably the best example of this, for me. The longer the game wears on, I become more and more concerned that I am about to face two Blocking Wargs and a Southron Support and get wiped out in a single round. For some reason, I don’t have that same paranoia when it comes to Siege of Cair Andros, but that’s probably because I love to play A Burning Brand, so the shadow effects don’t usually chain.
Hey Dan, this is not showing up in the Beorn’s Path section…FYI
Thanks for the heads up, I just added the link.
Was this a first try to play Do Guldur with this decks?
No, this was actually my third attempt with these decks. The first time I had started with three enemies in the staging area and by the end of the first quest phase it was obvious that the game was over (though I did continue playing until I actually lost). The second attempt was much closer, I almost pulled it off but lost to Ungoliant’s Spawn and the Nazgul right near the end of stage 2. I chose this third attempt for the article since I figured that most new players would not want to read about how NOT to escape from Dol Guldur. That said, losing does not bother me, especially when I have an opportunity to learn about my deck, or a better play strategy.
Thanks for commenting, Ахель, and welcome to the Hall of Beorn!
Wow, I just found this article series, four years later…! but anyways, having only a single copy of the core set (and some mirkwood expansions) myself,I really value that you use only the available cards! really helpful reading. Aknowledging that you also lost a few times makes me glad, since that proves it’s not just me being rubbish, but rather that one must expect to lose more often than winning, if even expert and long time players like yourself only wins 1/3 attempts. looking forward to reading the rest of the articles in this great series!
Thanks for the kind words! Yes, playing this game involves an acceptance that you are not going to win every game. This holds true even with modern scenarios. Players are rewarded for tuning their decks (at least to some extent) to handle the specific challenges of a scenario. This is why I started this series in the first place. I’m glad that you are finding it helpful. Good luck!
Pingback: Key Concepts: Efficiency | Hall of Beorn
These are really nice decks. I won this on my first try but i had great hands to start, the nazgul did not get a shadow effect and the 3 pieces you needed had minor annoyances on them rather than hard ones. Speaking of which i noted that you did not put an encounter on the key just on the map and the other object (which i cannot remember its name). Also can you take care of the encounter and then actually take the piece off the staging area seperatly? Thank you, again
During setup, the guard that I drew for the Shadow Key was “The Necromancer’s Reach”. Fortunately, all characters are ready during setup, so this card has no effect. After resolving a treachery, the card that it was guarding is considered unguarded. This is why I list the Shadow Key as unguarded in my subsequent round summaries.
To answer your question: yes, you do not have to claim an objective immediately after you defeat the guarding enemy or explore the guarding location. The quest phases themselves are what determine when you have to claim the objectives, but in this scenario it is definitely to your benefit to wait as long as possible before claiming the objectives.I’m glad that you had success with these decks!
Pingback: Nazgûl of Dol Guldur | Master of Lore
Pingback: Poll Results: Hardest Standard Scenario | Hall of Beorn
Myself and my partner played our first attempt at this scenario this evening. It was a thrill, very close. We got as far as the end of stage 2 and were overwhelmed by the Nazgul and a bunch of 5 HP orcs that finally finished us off, along with an undefended Shadow effect that raised one deck above 50 threat. So close! Lore deck paired with Spirit/Leadership. I think we fell into the trap you mentioned of NOT piling ahead as quickly as possible and bided our time a little too long on stage 1.
I enjoy your playthroughs. I learn something new and subtle about the game from each of your articles. Keep them coming!
That’s awesome, Meg! The whole reason I created Beorn’s Path (and the blog in general) was to share my love of this fine game. It makes me very happy to hear when people benefit from the articles.
Good luck!
With your deep analysis of this nasty scenario, i managed to pull off a victory. My heroes saw the light of day again but sadly, the rescued hero died on the way out. The necromancer`s reach was too much for poor Denethor.
Thanks for the help!
I’m glad to hear it, Vincent. Have safe travels through Middle-earth!
Pingback: Two Years of the Hall of Beorn | Hall of Beorn
It is nice seeing myself, the great Chieftan, in this marvelous post by the the great ursine blogger.
Nevertheless, I am disappointed that you potrayed me incorrectly. When one inspects the rules carefully, one may find that I, Ufthak, first attack with a strength of 3+2, that is, 5.
But thanks for the Beorn’s Path playthroughs. They are very interesting and enlightening.
Thanks, Chieftan. I’m glad that you enjoy Beorn’s Path!
Actually, I believe I played your ability correctly. The FAQ says that “after this enemy attacks” effects resolve immediately after step 4. Because the Chieftan’s attack strength is determined in step 4, he does not yet have a resource token, so his attack strength is only 3. Immediately after this step his attack becomes 5, but it has already been determined in step 4, you do not “determine” is again because his effect does not tell you to do so.
Here are the relevant links:
Click to access LotR-FAQ.pdf
Click to access LOTR_LCG_Core_rules_eng_Lo-Res.pdf
In the questing phase we completed step 2B with all 3 objective cards, in the following combat phase the shadow effect was (driven by shadow) return 1 attachment which in this case had to be one of the objectives. As it was the only one the hero had – can we proceed with phase 3B ? There is no reqt there that I can see that still needs the objectives.
That is correct, once you make it to stage 3 the objectives no longer matter so having to discard an objective does not stop you from completing the quest.
Pingback: El Señor de los Anillos LCG: Cómo escapé de Dol Guldur sólo con lo puesto - Juegos de mesa, reseñas y opinión.
Thank you for detailing out all of these success stories for scenarios! Sometimes it can feel almost impossible to finish some of these quests. I know when I played this particular quest for the first time with my brother, we got some of the rules wrong/forgot things and just barely scraped by, so we couldn’t really consider it a win. Since then I have tried to make sure I follow the rules very carefully and never seem to be able to obtain a success. Maybe I will with these decks.
Is there anything you do to keep your spirits up when decks seem to keep on failing? Or is that something you don’t really run into? I know deck building is not a talent of mine, so it can get really discouraging sometimes.
I can relate to frustration at being stuck on a particular scenario. Deck-building does get easier with practice. The other thing that I will do if I am getting frustrated by a particular scenario is to mix things up and try a different quest to clear my head and get a better perspective. Escape from Dol Guldur is a punishingly difficult scenario, so you should not despair about not defeating it. I’ve only beaten it a couple of times myself, and I admit that I have little desire to go back and attempt it again. While I enjoy a challenge, I have always felt that this scenario has some balance issues where it depends far too much on the initial setup – such that players’ actions have less impact on the outcome of the game than in many other (better) quests. Again, this is just my opinion and I respect that other people might really enjoy this quest – but it is certainly not among my favorites. Are you limiting yourself to only cards from the Core Set? If not, there are definitely cards that come in later releases which can help tremendously with this scenario. If you happen to have two copies of the Core Set (or don’t mind using proxies), these decks are another alternative that you could try:
https://boardgamegeek.com/thread/1291842/beat-escape-dol-guldur-2-core-proxies-decks-how-lu
Let me know is you have any questions. Good luck!
Hi, do you have any experience with solo play against Dol Guldur quest? I tried different decks but no result… Any advice?
I do have experience playing and beating Dol Guldur solo, but not with a deck consisting of only Core Set cards. That is a level of masochism that I just cannot justify. Are you trying to play it solo with only the Core Set, or are you willing to use cards that were released later in your deck?
I agree with you about masochism and playing Dol Guldur solo with the Core Set cards… I tried with a dwarves deck (digging too deep), with an Aragorn (Lore) Frodo (Spirit) Eowyn and Eowyn, Beregond Glorinfindel. But only 1 try was close to success (with the last deck)… Any advice? Thanks a lot!
I was able to escape from Dol Guldur solo using an earlier version of my Keep it Secret, Keep it Safe deck. You might have success if you try a Secrecy-based strategy. It will often come down to luck because the setup can absolutely ruin you before you start. Let me know if that doesn’t work for you.
Success!! to be honest, I got the success in the quest after many many attempt! Anyway, thanks a lot for the suggestions 🙂
Well done! I’m glad to hear that you were able to Escape from Dol Guldur. That is a feat worth celebrating.
Thank you so much for this great series, it’s helped me learn the game no end. I have a couple of Q’s..firstly, we’re you correct in round 1 when you stated that the Dol Goldur Beastmaster would engage player 1 that turn? You chose to optionally engage it with player 2,however I think it’s threat was to high at that stage to engage player 1… Am I right?
Also, could you expand on the notion that there are ways of introducing multiple allies per round, thereby getting around the 1 ally per round limit. I understand the cards that do this, ie Sneak Attack (and others?) but I don’t fully understand why..
Cheers for running such a great series, it’s really enabling me to get the most out if my game!
Yes, the Beastmaster’s 35 engagement cost meant that neither deck was forced to engage it. I chose to optionally engage it to get its threat out of the staging area. I did not mean to imply otherwise.
Stage 1B says: “The players, as a group, cannot play more than 1 ally card each round.”
There is a difference between “playing” an ally (paying it’s cost during the planning stage) and “putting into play” an ally. Putting an ally into play requires a card effect (e.g. Sneak Attack, Stand and Fight) but does not necessarily involve paying the entire cost of that ally. Also, since the effects which put allies into play are usually actions, they can be triggered during phases other than the planning phase. To summarize, if you are playing an ally card from your hand for its cost during the planning phase, without the use of another card effect, then you are “playing” that ally and it counts against the 1 ally per turn limit on stage 1B. If you use a card effect such as Sneak Attack to “put an ally into play” it does not count against this limit.
I’m glad that you are finding Beorn’s Path helpful and I hope that this helps to clear up your questions.
That’s really helpful, thank you for responding 🙂
Is it do-able / or was the Escape scenario (in your opinion) designed to even be played solo with a core set deck as is? I have I followed your blog and built the decks and have had great experience (just waiting on a couple of expansions to arrive in the mail so I can keep going). So I appreciate what you’ve done here. But now that I have learned the game (yes, noob here) and realized my mistakes such as how I played Caught in a Web, which now I see why everyone really hates, and so on, I just can’t imagine beating these last two scenarios with any of the single as is core set decks solo. However, I have time on my hands, as I’m recovering from an injury, so i’m determined to put this to the test just to see how horrible of an experience this will be. Anyway, I guess just really want to say Thanks! first and second ask whats up with this scenario and the guys that designed it? 😀
I would not recommend Escape from Dol Guldur for solo play. While it is beatable, you will be so dependent on getting a lucky setup that it can be very frustrating. Escape from Dol Guldur is much more enjoyable with 2 or 3 players as the other players can help support the player who starts with one of their heroes as a prisoner. In solo you will need to find a way to clear the first quest stage with only 2 heroes and you won’t have help from other players. Without a very forgiving setup a solo core set deck is going to be challenged to even clear the first stage. Good luck!
Thanks, yeah that’s what I thought. I figured it after the Anduin that Escape wasn’t really geared for Solo but was surprised there wasn’t really any note in the game about it, but I suppose most of us playing LOTR LCG are smart enough to figure that out on our own. Thanks again for your work on this. Has really been a great help getting a noob up to speed! I love this game 🙂
Although you created your post long ago, Please know that new players like myself are benefitting from it. Thanks!
It’s always good to hear that people are benefiting from my writing, no matter how old it might be.
“Theodred will only be able to add resources to Thalin, Gimli or Eowyn when the Tactics/Spirit deck is the first player. For this reason, we will choose to have the Tactics/Spirit deck start the game as the first player.”
This confused me at first. Wouldn’t Théodred only be able to give his extra resource to the Leadership/Lore deck if it was first player (because the Spirit/Tactics hasn’t had the opportunity to commit to the quest yet). If Spirit/Tactics goes first then Theordred could give his resource to anyone (because he’d be the last “player” to commit to a quest). Right?
With the Tactics/Spirit deck as the first player, Théodred can give his bonus resource to any questing hero from either deck (on the first round). If the Leadership/Lore deck is first player, the other decks’ heroes will not yet be committed to the quest when Théodred commits, so you would only be able to choose Leadership/Lore heroes to get the bonus resource on the first round.
The wording explaining this was a bit awkward, so I have clarified it in the original text to remove any ambiguity.
Thanks for the quick reply!! Also, really appreciate your in-depth analyses of all the quests!! Haven’t beat this one yet (Eowyn was captured and two caught in webs came out first round… Got a bit land flooded and couldn’t keep up with questing in later rounds) but I’ll keep at it!!
Pingback: Quest Profile 003: Escape from Dol Guldur | Master of Lore
Will these two decks work well on the first two quest also? My wife and I play together and have beat the first two quest but thinking of trying these decks vs them first to familiarize ourselves to the decks.
Yes, these decks should work well together for the first two quests. For Journey Along the Anduin just be sure to look for Feint, Forest Snare or Gandalf to help you deal with the Hill Troll. Good luck!
Just wanted to let you know that 6 years since you posted this its still extremely useful!
I started playing LOTR LCG a couple of months ago and im also trying to beat all 3 quests from the core set using only the cards within it. So far i managed to beat quests 1 and 2 consistently and im currently with the challenge to beat this one (I managed to beat it once without using gold encounter cards).
Thanks!!
Thanks! I’m glad to hear that these articles are helpful to you. Don’t worry too much about beating Escape from Dol Guldur solo using only Core Set cards, it is better suited to two player.
Love this posts. They are so helpful for a begginer like me. Thanks a bunch and keep this great content 🙂
Hello.
Thanks for your help.
I would like to ask one doubt that happened to me in my last game related to progression through the Stages.
I am on Stage 2B and let’s say that I am just after the resolution of the Quest Phase and that I have the necessary progress token on the missio to pass to Stage 3 but I want to stall it until the final of the round (so that I avoid the Encounter phase and the orc guards encounters). For example, I was thinking about claiming the objectives during the action windows on the Resources phase of next round.
May I do this or am I forced to progress to Stage 3 always at the end of the Quest Phase and then facing the encounters coming in that moment.
Thanks.
Gabriel.
Yes, you can wait to pick up any/all of the three objectives until you are ready for the final stage. Because claiming the objectives is an action it is not forced. They can sit unclaimed in the staging area until you are ready to move on to the final stage. You can use any player action window (including the one in the resource phase you mentioned) to claim and unclaimed objective. Good luck!
Thanks